Introduction
The following sections give a simple overview how to make a simple TIM API integration without any special configurations. Therefore default values are used as often as possible to keep it simple. If special features are required, visit the section Integration in Detail for a more sophisticated overview.
Library usage
As the TIM SDK offers the TIM API in multiple languages you can chose the one that is suitable for your platform. To use the TIM API Java you have to import the JAR-File into your project in the programming environment you are using. The file include path may have to be adjusted accordingly, depending where you place the TIM API.
Minimal Settings
To start right away only a minimal set of settings has to be given:
- Logging Directory: The directory where the LogFile shall be saved.
- Terminal ID: The ID of the terminal that shall be used afterwards. Used for broadcast connection (Default).
- Terminal IP: The IP of the terminal that shall be used afterwards. Used if direct connection is used: ConnectionMode = OnFixIp
- ConnectionMode: Only if "OnFixIp" with set Terminal IP shall be used. (Default: ConnectionMode = Broadcast)
AutoCommit: Defines if terminal performs a Commit automatically or if it must be done from the ECR. (Default: AutoCommit = true)
This minimal configuration can either be done using the TimApi.cfg configuration file,
which must be located in the same directory as the TIM API, or directly in the code after creating a TerminalSettings instance.
This block shows the minimal setup with broadcast connection mode:
// Create new TerminalSettings instance
TerminalSettings settings = new TerminalSettings();

// ----------------------------LOGGING----------------------------

// Set the Logging directory path where the log file will be saved
// This may lokk different depending on the OS you are using
// UNCOMMENT the section you need

// --------------Example for WINDOWS--------------
// settings.setLogDir("C:\Temp\Logs");

// --------------Example for LINUX/macOS--------------
settings.setLogDir("/home/myUser/tmp/logs");


// ----------------------------CONNECTION----------------------------

// If default ConnectionMode = Broadcast is used the following has to be set:
settings.setTerminalId("12345678"); //TerminalId of the terminal that shall be used.


// ----------------------------COMMIT----------------------------

// If the ECR shall be responsible to perform a commit the following parameter has to be set.
// Otherwise the terminal performs a commit automatically.
settings.setAutoCommit = false;


// ----------------------------CREATE TERMINAL INSTANCE----------------------------

// Create a terminal instance using the adjusted terminalSettings object
Terminal terminal = new Terminal(settings);
This block shows the setup with the fixed ip connection mode:
// Create new TerminalSettings instance
TerminalSettings settings = new TerminalSettings();

// ----------------------------LOGGING----------------------------

// Set the Logging directory path where the log file will be saved
// This may lokk different depending on the OS you are using
// UNCOMMENT the one section you need

// --------------Example for WINDOWS--------------
// settings.setLogDir("C:\Temp\Logs");

// --------------Example for LINUX/macOS--------------
settings.setLogDir("/home/myUser/tmp/logs");


// ----------------------------CONNECTION----------------------------

// If a direct connect shall be made the following parameters have to be set:
settings.setTerminalIp("192.168.2.12"); //IP address of the terminal.
settings.setConnectionMode(ConnectionMode.ON_FIX_IP); // ConnectionMode must be set to ConnectionMode.ON_FIX_IP


// ----------------------------COMMIT----------------------------

// If the ECR shall be responsible to perform a commit the following parameter has to be set.
// Otherwise the terminal performs a commit automatically.
settings.setAutoCommit = false;


// ----------------------------CREATE TERMINAL INSTANCE----------------------------

// Create a terminal instance using the adjusted terminalSettings object
Terminal terminal = new Terminal(settings);
After the Terminal instance has been created it can be used to perform transactions.
In the TimApi.cfg file the following parameter can be set:
[global]

# ---------------LOGGING----------------
# Define the logging path where to save the TIM API log file.
# The path format may differ depending on the OS that is used.

# --------LogDir Example WINDOWS--------
#LogDir = C:\Temp\Logs

# -----LogDir Example LINUX / macOS-----
LogDir = /home/myUser/tmp/logs


# --------------CONNECTION--------------
# -------ConnectionMode Broadcast-------
# TerminalId is ONLY used with default ConnectionMode = Broadcast
TerminalId = 21001234

# --------ConnectionMode OnFixIp--------
# ConnectionMode = OnFixIp must only be set
# if the default value ConnectionMode = Broadcast shall NOT be used.
# Remove the hashtag below if you want to use ConnectionMode = OnFixIp.
# ConnectionMode = OnFixIp

# TerminalIp is ONLY used if ConnectionMode = OnFixIp is set.
ConnectionIPString = 192.168.1.13


# ----------------COMMIT----------------
# If the ECR shall be responsible to execute a Commit "AutoCommit" must be set to "false"
# Else the terminal will perform it automatically.
# Remove the hashtag below so that the ECR is responsible to perform a commit.
# AutoCommit = false
The TimApi.cfg file has to be placed in the working directory used when the java process is launched. Set the working directory accordingly for running your application to make sure TimApi.cfg is found.
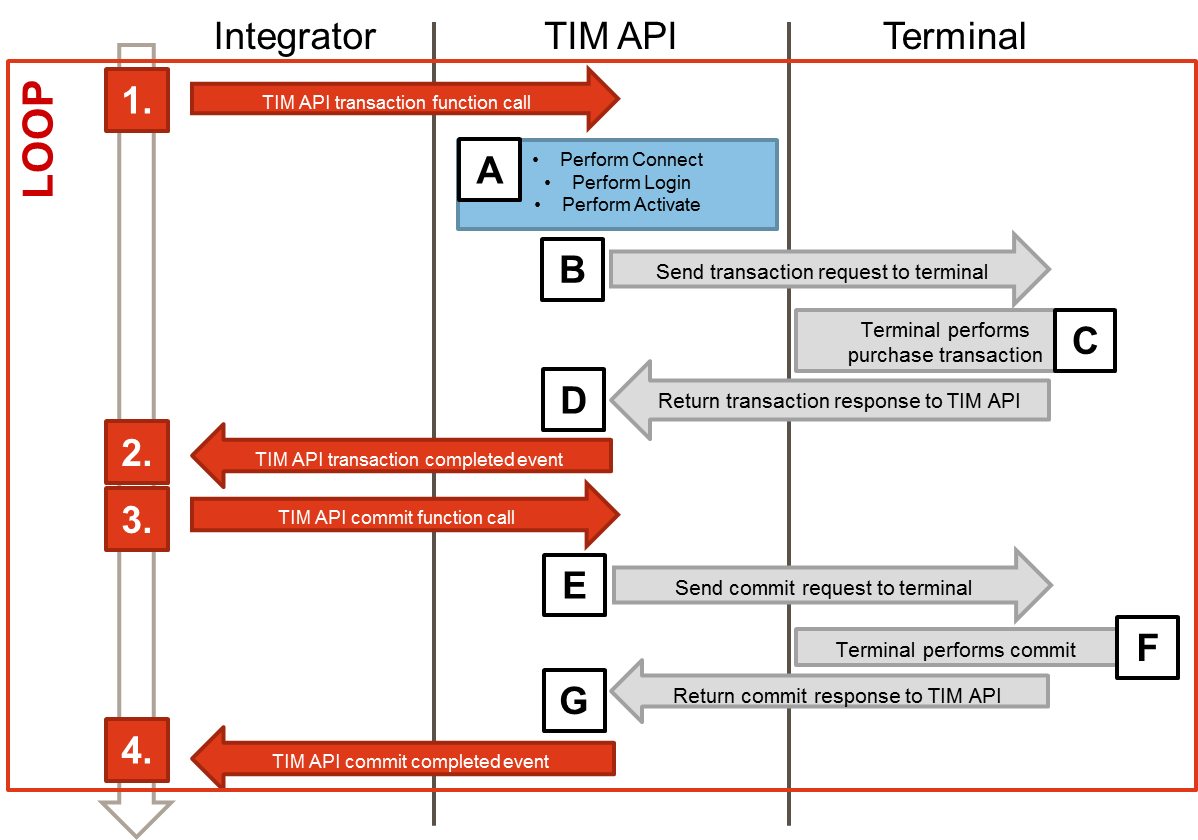
Simple Transaction
The flow on the right shows a simple transaction flow and which steps are done by which participant. Note that for a simple use the integrator only needs to follow 4 simple steps, steps 1 to 4. Steps 1-4 can be performed multiple times (loop) if wished. The rest, steps A to G, will be done either by the TIM API itself or by the terminal if required.
The steps the integrator has to perform are the following:
- 1. Start transaction: The integrator has to call the
transactionAsyncfunction including the required parameters which are shown in the code example below. - 2. Process transaction completed: After processing the transaction the TIM API will return a
TransactionResponsein the correspondingtransactionCompletedcallback method. - 3. Send commit (if AutoCommit deactivated): After receiving the feedback in the transactionCompleted callback the integrator has to call the
commitAsyncfunction to complete the transaction process. This step must only be done if AutoCommit has been set to "false" in the terminal settings. - 4. Process commit completed (if AutoCommit deactivated): Also the commit function is finished from the TIM API by calling the
commitCompletedcallback function. After getting the commit completed callback call from the TIM API, another requests, e.g. another transaction, can be called.
The following steps are performed by the TIM API or the terminal if they are required:
- A. : The TIM API automatically connects to the terminal and makes the required Login to set the
specified connection parameters. If successful a shift will be opened on the terminal by calling Activate from the TIM API automatically.
These steps are only performed if they are required which means the terminal was not yet in the corresponding state and not yet ready to accept a transaction:
- If the terminal is already connected, no connect is required.
- If the terminal is already in LoggedIn state, no login is required.
- If the terminal is already in Activated state (open shift), no activate is required.
- B. : After the TIM API performed all steps needed to bring the terminal into the required state, the transaction request is sent to the terminal.
- C. : The terminal performs the transaction (e.g. cardholder verification, transaction authorization etc.)
- D. : The terminal returns the outcome of the transaction to the TIM API.
- E. : The TIM API sends the commit request to the terminal (will be done automatically, if AutoCommit is activated).
- F. : The terminal processes the commit request.
- G. : The terminal sends the commit response to the TIM API.
In code this may look as follows:
package simpletransaction;

import com.six.timapi.Terminal;
import com.six.timapi.TerminalSettings;
import com.six.timapi.constants.TransactionType;
import com.six.timapi.Amount;
import com.six.timapi.constants.Currency;

public class SimpleTransaction {

    public static void main(String[] args) {

	// Create initial terminal settings
	TerminalSettings settings = new TerminalSettings();

	// Set the IntegratorId that has been provided to you by Worldline
	settings.setIntegratorId("0e6b1705-ab96-455b-9ba3-a77dd919d7a5");

	// Create new terminal
	Terminal terminal = new Terminal(settings);

	// Add all listeners to the terminal which you want to listen to
	terminal.addListener(TerminalListener myTerminalListener);

	// Check if the terminal is ready to receive a transaction
	if(terminal.getTerminalStatus().getTransactionStatus() == TransactionStatus.IDLE)
	{
		// Start transaction. Automatically connects to, loggs in and activates the terminal
		terminal.transactionAsync(TransactionType.PURCHASE, new Amount( 14.00,
		Currency.CHF));
	}
}
Simple Response Handling
The following section explains how to easily retrieve response data from the
TransactionResponse which is available after a transaction as described above.
The first step is to implement your own terminal listener class wherein you overwrite the functions you want to use. If you are mainly interested in the transaction response you can use the following code:
/** Asynchronous listener handling terminal events. */
class MyTerminalListener extends com.six.DefaultTerminalListener {

/* Overwrite all required methods from the DefaultTerminalListener class
 * herein which you want to use.
*/
}

// Create a new instance of the implemented MyTerminalListener
// class which then can be added to existing terminal object to handle
// the events that you've implemented.
terminal.addListener(new MyTerminalListener());
Check transaction outcome
To check if a transaction has been performed successfully you have to check the ResultCode
which is part of the
TimEvent object in thetransactionCompleted callback.
Further error information can be retrieved as described in the API documentation in the
TimException section.
IMPORTANT: Please note that only the enum value of the ResultCode can be used and NOT the int value, as this is generated code and the int value may not correspond to the int value shown in the TIM API log.
Print data
The TransactionResponse has a member PrintData
(accessed via getPrintData) which contains merchant and cardholder receipts.
The PrintData returned in the
TransactionResponse contains a merchant and
a cardholder receipt which can be retrieved in the transactionCompleted
callback using the getPrintData function. The PrintData object
then contains a list of Receipt objects which can be retrieved individually.
Card data
To retrieve card specific information the CardData object is also available in
the TransactionResponse. This object contains several card information that
was available to the terminal during the transaction process.
Further transaction information
Further information regarding the transaction can be found in the TransactionInformation object.
The following code shows how the information mentioned above can be retrieved in the
transactionCompleted event:
// These completed functions have to be implemented in your "MyTerminalListener"
// class to overwrite the standard implementation.

/** Transaction request completed either successfully or with a failure. */
@Override
public void transactionCompleted(TimEvent event, final TransactionResponse data) {
// Always super-call transactionCompleted(). This ensures requestCompleted() and
// printReceipts() are properly called. You can do you own processing before or
// after the super-call depending on your needs.
super.transactionCompleted(event, data);

TimEvent myEvent = event;

  // Events usually originate from a different thread than the main thread.
  // Always use SwingUtilities.invokeLater to be safe
  SwingUtilities.invokeLater(new Runnable() {
  @Override
  public void run() {
      // handle transaction finished using data

/*--- Check transaction outcome ---------------------------------------*/

        // Check if transaction has been successful
        if (myEvent.getException == null)
        {
	  System.out.println("Transaction was performed successfully!");

/*--- Print data ------------------------------------------------------*/

	// Further information can be retrieved as the transaction has be successful

	// Get print data which contains a list of receipts
	PrintData myPrintData = data.getPrintData();
	List<Receipt> myReceiptList = myPrintData.getReceipts();

/*--- Card data -------------------------------------------------------*/

	// Get CardData which contains all available card information
	CardData myCardData = data.getCardData();

	// Further card information can be retrieved out of the CardData object
	// e.g. AID or BrandName ...
	String aid = myCardData.getAid();
	String brandName = myCardData.getBrandName();

/*--- Further transaction information ---------------------------------*/

	// Further transaction information is available in the TransactionInformation object
	TransactionInformation myTrxInfo = data.getTransactionInformation();

	// This object contains e.g. acquirer id or transaction reference and more information..
	String acqId = myTrxInfo.getAcqId();
	String acqTransRef = myTrxInfo.getAcqTransRef(); // If available
	String trmTransRef = myTrxInfo.getTrmTransRef();

        }

/*---------------------------------------------------------------------*/

	// If the transaction has not been successful the result code can
	// be retrieved as follows to determine what went wrong
        else
        {
	  System.out.println("Transaction was NOT performed successfully:" +
	  		     myEvent.getException().getResultCode().toString());
        }
      }
    });
}