Introduction
The following sections give a simple overview how to make a simple TIM API integration without any special configurations. Therefore default values are used as often as possible to keep it simple. If special features are required, visit the section Integration in Detail for a more sophisticated overview.
Library usage
As the TIM SDK offers the TIM API in multiple languages you can chose the one that is suitable for your platform. To use the TIM API C you have to import the Header-Files and LIB-File/DLL-File (on Windows) or so-File (on Unix) into your project in the programming environment you are using. The file include path may have to be adjusted accordingly, depending where you place the TIM API.
Minimal Settings
To start right away only a minimal set of settings has to be given:
- Terminal ID: The ID of the terminal that shall be used afterwards. Used for broadcast connection (Default).
- Terminal IP: The IP of the terminal that shall be used afterwards. Used if direct connection is used: ConnectionMode = OnFixIp
- ConnectionMode: Only if "OnFixIp" with set Terminal IP shall be used. (Default: ConnectionMode = Broadcast)
auto_commit: Defines if terminal performs a Commit automatically or if it must be done from the ECR. (Default: AutoCommit = true)
This minimal configuration can be done directly in the code after creating aterminal_settings instance.
This block shows the minimal setup with broadcast connection mode:
This block shows the setup with the fixed ip connection mode:
After the Terminal instance has been created it can be used to perform transactions.
Simple Transaction
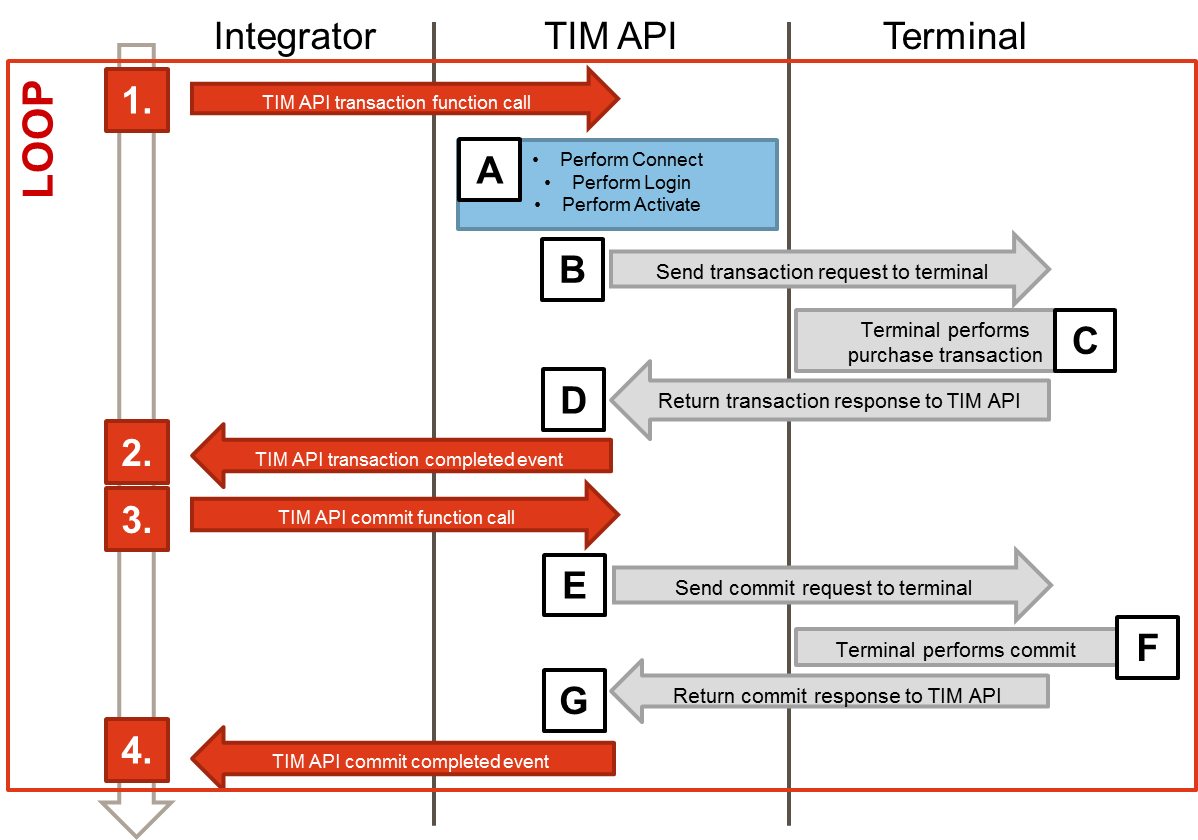
The flow on the right shows a simple transaction flow and which steps are done by which participant. Note that for a simple use the integrator only needs to follow 4 simple steps, steps 1 to 4. Steps 1-4 can be performed multiple times (loop) if wished. The rest, steps A to G, will be done either by the TIM API itself or by the terminal if required.
The steps the integrator has to perform are the following:
- 1. Start transaction: The integrator has to call the
transaction_asyncfunction including the required parameters which are shown in the code example below. - 2. Process transaction completed: After processing the transaction the TIM API will return a
transaction_responsein the correspondingtransaction_completedcallback method. - 3. Send commit (if AutoCommit deactivated): After receiving the feedback in the transactionCompleted callback the integrator has to call the
commit_asyncfunction to complete the transaction process. This step must only be done if AutoCommit has been set to "false" in the terminal settings. - 4. Process commit completed (if AutoCommit deactivated): Also the commit function is finished from the TIM API by calling the
commit_completedcallback function. After getting the commit completed callback call from the TIM API, another requests, e.g. another transaction, can be called.
The following steps are performed by the TIM API or the terminal if they are required:
- A. : The TIM API automatically connects to the terminal and makes the required Login to set the
specified connection parameters. If successful a shift will be opened on the terminal by calling Activate from the TIM API automatically.
These steps are only performed if they are required which means the terminal was not yet in the corresponding state and not yet ready to accept a transaction:
- If the terminal is already connected, no connect is required.
- If the terminal is already in LoggedIn state, no login is required.
- If the terminal is already in Activated state (open shift), no activate is required.
- B. : After the TIM API performed all steps needed to bring the terminal into the required state, the transaction request is sent to the terminal.
- C. : The terminal performs the transaction (e.g. cardholder verification, transaction authorization etc.)
- D. : The terminal returns the outcome of the transaction to the TIM API.
- E. : The TIM API sends the commit request to the terminal (will be done automatically, if AutoCommit is activated).
- F. : The terminal processes the commit request.
- G. : The terminal sends the commit response to the TIM API.
In code this may look as follows:
Simple Response Handling
The following section explains how to easily retrieve response data from the which is available after a transaction as described above.
The first step is to implement your own terminal listener class wherein you overwrite the functions you want to use. If you are mainly interested in the transaction response you can use the following code:
/*
 * Example for adding a terminal status listener
 *
 * \param[in] terminal Terminal instance
 */
void add_status_listener(ta_object_t terminal) {
    ta_object_t listener = ta_object_invalid;
    ta_s_terminal_listener_t listener_config;

    // clear listener-config
    memset(&listener_config, 0, sizeof(listener_config));

    // add user-implemented callback to listener-config
    listener_config.terminal_status_changed = mylistener_terminal_status_changed;

    // optional: add user content to listener,
    // pointer will be handed over to all callbacks:
    //listener_config.user_pointer = &custom_struct;

    // create listener-object
    ta_terminal_listener_create(&listener, &listener_config);

    // add listener-object to terminal
    ta_terminal_add_listener(terminal, listener);

    // release listener-object
    ta_object_release(listener);
}

/*
 * Callback for terminal status changes
 *
 * Will be called when status of terminal changes.
 * \param[in] terminal Terminal instance
 * \param[in] user_pointe User-pointer which can be set in the terminal listener
 */
void mylistener_terminal_status_changed(ta_object_t terminal,	void *user_pointer) {

	// implement your code to process status change here...
	//printf(" > listener_terminal_status_changed\n");
}
Check transaction outcome
To check if a transaction has been performed successfully you have to check the result_codewhich is part of the event object in the transaction_completed callback.
Further error information can be retrieved as described in the API documentation in the result_code section.
Print data
The transaction_response has a member print_data
(accessed via get_print_data) which contains merchant and cardholder receipts.
The print_data returned in the
transaction_response contains a merchant and
a cardholder receipt which can be retrieved in the transaction_completed
callback using the get_print_data function. The print_data object
then contains a list of receipt objects which can be retrieved individually.
Card data
To retrieve card specific information the card_data object is also available in
the transaction_response. This object contains several card information that
was available to the terminal during the transaction process.
Further transaction information
Further information regarding the transaction can be found in the transaction_information object.
The following code shows how the information mentioned above can be retrieved in the
transaction_completed event: