Introduction
The TIM API is the standard application interface for ECR integration using SIX Payment Services terminals.
TIM API provides a comprehensive feature set to support the requirements of several different markets. This guideline is intended to be used by ECR integrators that need to implement the TIM API functionality in their products.
The following document contains an overview structure, description of the TIM API modes synchronous/asynchronous and describes the corresponding functions, notifiers and data elements that can be used with the TIM API. Furthermore implementation examples are provided. Nevertheless always the corresponding description of a function or data element is authoritative, not the examples.
System Requirements
The TIM API is available for multiple platforms. Due to such diversity the support for the TIM API is limited to certain standards. Those are the minimal system requirements:
- iOS 10
- Swift 4.2
Setup Configuration
Once a
Terminal-instance has been created with a
TerminalSettings-instance, the settings can not be changed anymore.
Changes to the
TerminalSettings-instance will be ignored.
The network and guides configuration are explained in the following
chapters.
For further information refer toTerminalSettings.
Network Configuration
Depending on the platform used, the TIM API module can communicate with the Terminal over different communication channels.
The default communication is over TCP/IP connection. Default port used is 7784.
On mobile devices also a Bluetooth connection is possible.
For TCP/IP connection there are two possible ways to connect to the terminal:
-
Broadcast-Mode:
- Terminal ID (TID) is known.
- The TIM API starts broadcasting on the default interface and connects to the connection information sent by the matching terminal.
-
Direct Connect:
- IP address of the terminal is known.
- Connection is established directly via IP.
Guides Configuration
There are various
Guides
covering different use case scenarios. The guide Retail is the basic guide and is activated as
default. With
.guides
the guides can be configured. Important: the configuration needs to include all desired guides
(including
the retail guide).
Code-example for creating a terminal including settings with activated guides retail and hospitality:
// Create settings with Terminal-ID of terminal to connect to
let terminalSettings = try TerminalSettings()
terminalSettings.terminalId = "12345678"

// add wanted guides (with insert)
terminalSettings.guides.insert(CGuides.retail)
terminalSettings.guides.insert(CGuides.hospitality)

// Create terminal
var terminal = try Terminal(settings: terminalSettings)

//...

// Disconnect from terminal and clean up properly
terminal.dispose()
Operation Overview
Follow these basic steps for using the TIM API:
- Create
TerminalSettingsand initialize connection parameters (see Setup Configuration) - Create
Terminalinstance using the createdTerminalSettings - Set some properties where required:
- Define a
POS ID -
create mandatory
list of
EcrInfoand add withaddEcrData - create list of
PrintOptionsand set with.printOptions addListeners
- Define a
-
ConnectandLogin. This can be done automatically, when the first terminal operation is called or manually using the login method. - Use terminal operation functions.
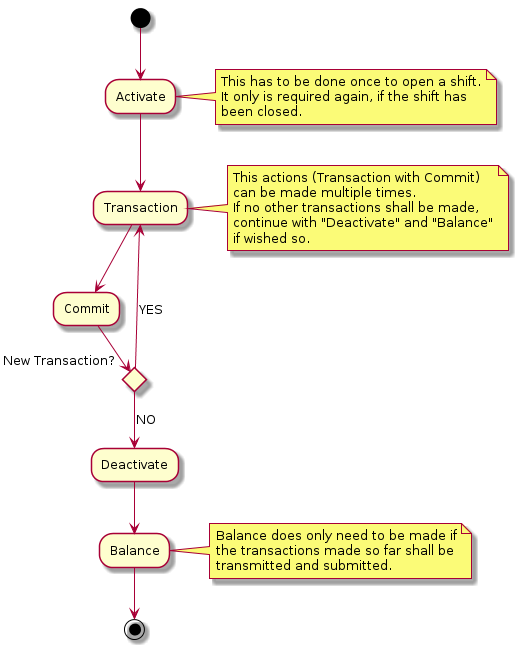
Automatisms
The TIM API uses two different types of automatisms:
-
Pre-Automatisms: This means that all actions that need to be done before a function can be called. E.g. a transaction can be called in disconnected state without having called connect, login and activate in advance. These are called automatically by the TIM API before the transaction is performed. The Pre-Automatisms are enabled by default.
-
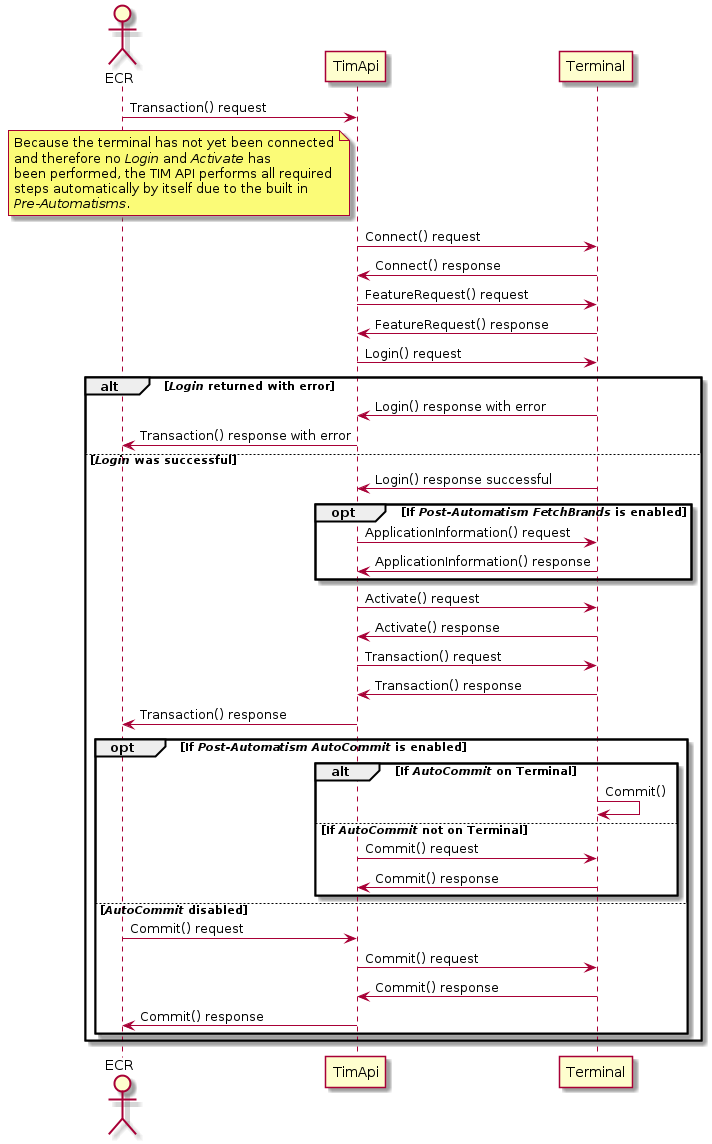
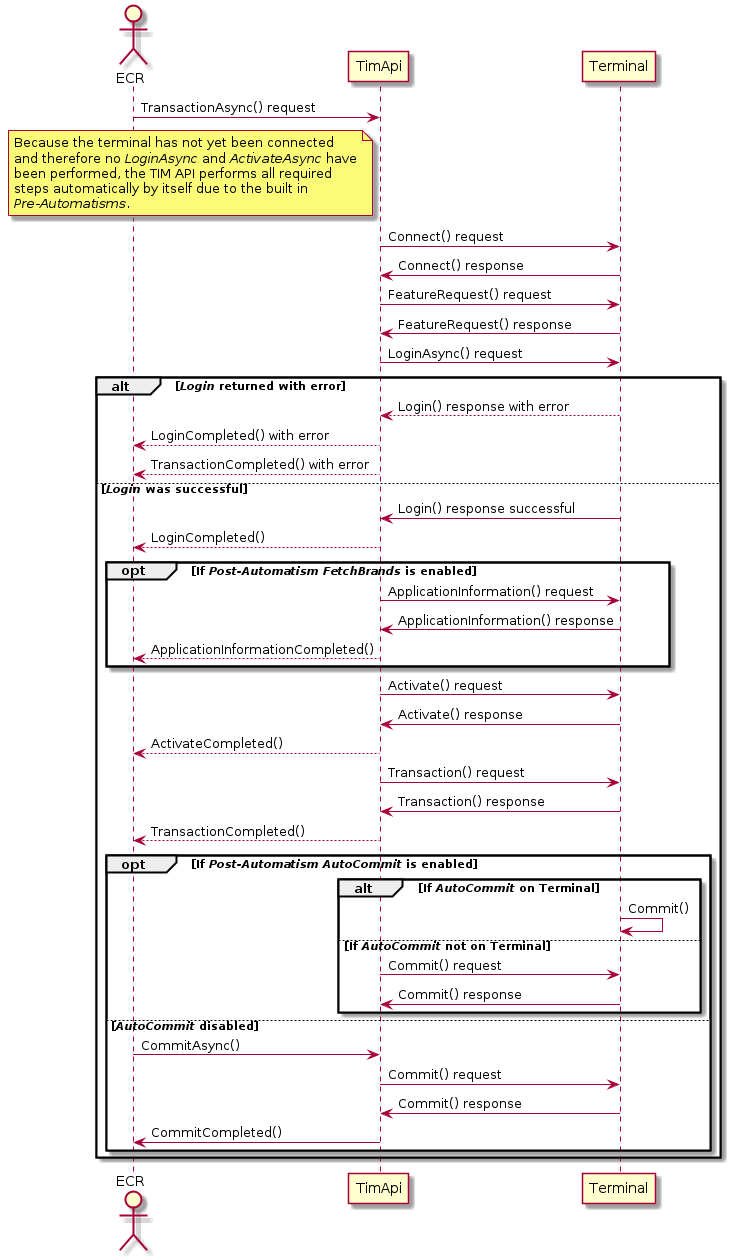
Post-Automatisms: These automatisms can be enabled or disabled using the members
autoCommitandfetchBrands. A Post-Automatism is triggered after an action has been performed. E.g. if a connect has been called andfetchBrandsis activated, anapplicationInformationrequest is called automatically after the connect. Or ifautoCommitis activated acommitis performed automatically after a transaction has been made.AutoCommitandfetchBrandsare enabled by default.
The following diagramsshow the principle of the Pre-Automatisms and Post-Automatisms. Pre-Automatisms are enabled by default and cannot be disabled. If an error occurs the started request from the ECR is returned with an error.
Synchronous flow
Asynchronous flow
Use Cases
This chapter describes various guides and their use cases.
Hint: if no content visible, try to select a guide under "Guide Selection" on the left.
Manual Pan Key Entry
The TIM API offers the possibility to perform a Manual Pan Key Entry (MPKE) on ECR side, e.g. if no physical card is present.
This can be done by setting the CardRef field in the TransactionDatacontainer
present in the terminal instance.
This CardRef field must have the following format to reference a non-PCI PAN:
Example: "061234567801234567" : "06" is the prefix that defines the content type that follows (non-PCI PAN), "1234568701234567" is then the non-PCI PAN.
Important: The MPKE on the ECR is only allowed for non-PCI brands, otherwise the manual entry must only be performed on the PIN Pad.
Guide Petrol Use Cases
Petrol functionality adds a number of
additional methods,
transaction types,
containers (AdditionalInfoList,
Basket) and
container content (ProcessingDisposition)
notifiers and
flows
tailored to the needs at petrol stations.
Petrol has the following basic use cases:
Petrol Basket Handling
An essential part of the petrol use cases is the usage of the Basket container.
This container is used to exchange information regarding purchased goods and fuel at a petrol station. It is important to know that the correctness of the content
of the basket container lies within the responsibility of the ECR and/or the acquiring host, not of the TIM API or the terminal.
The Basket is sent from the ECR to the terminal, then from the terminal to the host.
The host may adjust the content of the Basket depending on the card used for the transaction,
therefore the Basket sent from ECR to terminal may differ from the
Basket returned from terminal to ECR.
A Basket may be used with the following TransactionTypes:
- Purchase
- FinalizePurchase
To send a Basket within a request, the TransactionRequest
must be created by the integrator and the Basket
and its BasketItems must then be set in the TransactionRequest.
The TransactionRequest is then used as parameter of the Transaction/
TransactionAsync
function.
Indoor - Online Card
Online cards are processed like a standard credit or debit payment card through an online system,
no mather if it is a standard credit card or an oil company card. In the latter case however,
depending on the exact brand rules, additional data must be supplied by the ECR system
(usually the type of goods being purchased, see Basket)
and may be collected form the cardholder (e.g. ID number) and sent on to the online system.
The data is also provided back to the ECR via the Basket
and AdditionalInfoList containers.
An online system may decline parts of the purchase basket.
The transaction flow differs from the standard scenario in an additional way. To distinguish
between online cards (this scenario) and offline cards
(that scenario ) it is
necessary to first initiate a card detection through an
InitTransaction call.
This is an indoor scenario, i.e. takes place in an attended environment, usually a shop that is part of the petrol station. See this flow for reference.
Outdoor - Online Card
Outdoor - Online Card is esentially the same scenario as above. The difference is that it takes place on an unattended terminal generally located at or near the petrol pump.
This scenario requires that exchange of goods for money is slightly altered. The new
sequence of events is: check if sufficient funds are available, hand out goods, finalize
the funds transfer after the final amount is known. This is supported through the
transaction types PreAuthorization and
FinalizePurchase.
This is an outdoor scenario, i.e. takes place in an unattended environment, usually at the petrol pump. See this flow for reference.
Indoor - Offline Card
Offline cards are cards that are processed entirely by the ECR system. The EFT operates only
as a card reader, display and keyboard for the ECR. The ECR recognises offline cards based on
the ProcessingDisposition
returned from InitTransaction.
After the completion of InitTransaction
the ECR is responsible for all further interaction. For cardholder interaction a number of
dialogs (part of the "Dialog" guide) can be used.
This is an indoor scenario, i.e. takes place in an attended environment, usually a shop that is part of the petrol station. See this flow for reference.
Outdoor - Offline Card
Outdoor offline processing of cards does not differ from indoor online processing.
This is an outdoor scenario, i.e. takes place in an unattended environment usually at the petrol pump. See this flow for reference.
Guide Unattended Use Cases
Unattended functionality is aimed at the needs of vending machines an similar devices. It adds
additional methods,
transaction types and
flows.
Unattended has the following basic use cases:
Use Case Partial Commit
commit-function has an amount parameter.
See this flow for reference.
Use Case Hold Commit
Use Case Amount Adjustment
Use Case Retain Card
Use Case Silent Abort
Guide Austrian Use Cases
The Austria guide adds two new use cases:
- Non guaranteed payment (NGV)
- Delayed payment
Both use cases do not add any new functions.
Only the standard TransactionAsync
and Transaction functions with
TransactionType Purchase are
used with additional parameters the can be set in TransactionData
before starting the purchase transaction.
Austrian Use Case: NGV
An NGV payment is used in conjunction with a standard purchase transaction. The difference is that the purchase is handled
as an own risk transaction for the merchant.
Before starting a purchase transaction the NGVMode can be set
according to NGVMode to define the NGV behaviour of a transaction.
With the NGVMode it is possible to either forbid NGV usage for the next transaction,
to allow it with a fallback to a standard purchase transaction or to set NGV usage to mandatory.
- If the NGV usage is explicitly forbidden the purchase transaction must be performed as a standard purchase.
- If the NGV is wished but fallback is allowed it is possible that the current purchase will either be performed as an NGV purchase or automatically as a standard purchase in case it is not possible to make an NGV purchase.
- If NGV usage is set to mandatory the current purchase transaction must be performed as an NGV purchase. If this is not possible the purchase transaction fails without fallback.
To identify if the current transaction has been performed as an NGV purchase or not a new boolean flag NGVUsedFlag
has been introduced in the TransactionResponse. For statistics the NGV transactions can also be identified
in the Counters using the same NGVUsedFlag.
Austrian Use Case: Delayed Payment
The delayed payment can only be used in conjunction with an NGV purchase.
For delayed payments, the clearing of a transaction is delayed by the clearing house for the defined number of days.
The delay is set using the ClearingDelay member in
TransactionData.
Terminal methods overview
The basic operation modes of terminal method calls are:
-
Synchronous
Method calls are blocking and return after the operation is finished successfully or throw a TimException otherwise. Please not that it is highly discouraged to use synchronous method calls on mobile platforms like iOS because the main thread will be blocked by a synchronous call which may not be tolerated by the platform, as they are quite strict regarding blocking calls. This may result in a crash of the mobile App. -
Asynchronous
Method returns immediately after the operation has started or throws aTimExceptionotherwise. A listener-event-method will be called after the operation is finished successfully. All listener-event-methods contain aTimEvent. In case of failure aTimExceptionis included. User-implemented listener-handlers can be added to theTerminal-instance withaddListener.
If asynchronous functions are used there are two ways to handle the callbacks:
- Either the protocol
TerminalListenercan be used directly. Which means that all defined protocol function must be implemented. - Or the prepared default protocol implementation
DefaultTerminalListenercan be used and only the necessary protocol function must be overwritten.
Code example for adding a terminal listener:
Main / guide Retail terminal functions
|
Sync method
Async method Completed event |
Description |
|---|---|
activate
activateAsync
activateCompleted
|
Open a user shift. |
applicationInformation
applicationInformationAsync
applicationInformationCompleted
|
Request the list of brands available on the terminal. |
balance
balanceAsync
balanceCompleted
|
Force the EFT Terminal to transmit all transactions to the
host system as well to do the daily closing. |
cancel
|
Aborts an open asynchronous Financial Transaction or Non-Financial Transaction request, except for a commit or rollback request, which cannot be cancelled. |
changeSettings
changeSettingsAsync
changeSettingsCompleted
|
Change configuration parameters of the EFT Terminal. |
commit
commitAsync
commitCompleted
|
Perform Commit-operation after a successful Transaction call. |
connect
connectAsync
connectCompleted
|
Initiates a connection to the EFT Terminal. |
counterRequest
counterRequestAsync
counterRequestCompleted
|
Get counter information`s from the EFT Terminal. |
dccRates
dccRatesAsync
dccRatesCompleted
|
Request DCC rates from the EFT Terminal. |
deactivate
deactivateAsync
deactivateCompleted
|
Close a user shift. |
disconnect
disconnectAsync
disconnected
|
Interrupts the connection to the EFT Terminal. |
hardwareInformation
hardwareInformationAsync
hardwareInformationCompleted
|
Get hardware information from the EFT Terminal. |
login
loginAsync
loginCompleted
|
Activate a communication session between the ECR and
the terminal. |
logout
logoutAsync
logoutCompleted
|
Terminate an active communication session between the ECR and the terminal. |
reboot
rebootAsync
rebootCompleted
|
Force the EFT Terminal to reboot. |
receiptRequest
receiptRequestAsync
receiptRequestCompleted
|
Receive the latest receipt or a list of silent receipts. |
reconciliation
reconciliationAsync
reconciliationCompleted
|
Force the EFT Terminal to transmit all financial transactions
to the host system. |
reconfig
reconfigAsync
reconfigCompleted
|
Force the EFT Terminal to get the configuration from the service center. |
rollback
rollbackAsync
rollbackCompleted
|
Prevent a transaction from being committed to the transaction
log and generates a technical reversal of the authorization. |
softwareUpdate
softwareUpdateAsync
softwareUpdateCompleted
|
Force the EFT Terminal to start a Software Update. |
systemInformation
systemInformationAsync
systemInformationCompleted
|
Request system information from the EFT Terminal. |
transaction
transactionAsync
transactionCompleted
|
Starts an EFT Terminal Transaction. |
Guide Petrol terminal functions
|
Sync method
Async method Completed event |
Description |
|---|---|
initTransaction
initTransactionAsync
initTransactionCompleted
|
Retrieve card data for the presented card. |
Guide Unattended terminal functions
|
Sync method
Async method Completed event |
Description |
|---|---|
openReader
openReaderAsync
openReaderCompleted
|
Opens the shutter of the card reader. |
amtAdjustment
|
Send an amount adjustment notification to the terminal during an open transaction. The amount is used as the new amount for the transaction. |
closeMaintenanceWindow
closeMaintenanceWindowAsync
closeMaintenanceWindowCompleted
|
Prohibits the EFT terminal from performing any triggered maintenance tasks. |
closeReader
closeReaderAsync
closeReaderCompleted
|
Closes the shutter of the card reader. |
commit
commitAsync
commitCompleted
|
Commits a transaction after succesful authorization. A lower amount may be commited than the authorized amount. |
ejectCard
ejectCardAsync
ejectCardCompleted
|
Ejects the card from the card reader. |
holdCommit
|
Increases the commit timeout. |
openMaintenanceWindow
openMaintenanceWindowAsync
openMaintenanceWindowCompleted
|
Opens a maintenance window where the terminal can perform all maintenance processes it was not able to perform before.> |
Guide Dialog terminal functions
|
Sync method
Async method Completed event |
Description |
|---|---|
openDialogMode
openDialogModeAsync
openDialogModeCompleted
|
Open dialog mode on the terminal. |
closeDialogMode
closeDialogModeAsync
closeDialogModeCompleted
|
Close dialog mode on the terminal. |
showDialog
showDialogAsync
showDialogCompleted
|
Show dialog on the terminal. |
showSignatureCapture
showSignatureCaptureAsync
showSignatureCaptureCompleted
|
Show signature capture on the terminal. |
Additional terminal listener-events
| Listener-event | Description |
|---|---|
requestCompleted
|
Operation started by an asynchronous function has finished.
Applications can use both operation specific completion callback in combination with this generic completion callback. |
terminalStatusChanged
|
The terminal status has changed. The new status can be
retrieved from the TerminalStatus property. |
Flows
This chapter describes various flows for specific guides.
Hint: if no content visible, try to select a guide under "Guide Selection" on the left.
Petrol Additional Flows
Petrol Flow: Indoor - Online Card
Petrol Flow: Outdoor - Online Card
Petrol Flow: Indoor - Offline Card
Petrol Flow: Outdoor - Offline Card
Guide Unattended Additional Flows
Flow: Partial Commit
Flow: Hold commit
Flow: Amount adjustment
Flow: PreAuthorization
Flow: Retain card
Flow: Silent abort
Guide Austrian Additional Flows
Austrian Flow: NGV Purchase without delay
The following flow describes an NGV purchase without any specific clearing delay set. The NGVMode "AllowedWithFallback"
is used which indicates it the card used is not capable of NGV payments the terminal is allowed to make a fallback to a standard purchase. This flow shows a
successfully performed NGV payment which can be seen by checking the value NGVUsedFlag, which is set to "true".
Austrian Flow: NGV Purchase with delay
In the flow below, additionally to the NGVMode "AllowedWithFallback" also the
ClearingDelay is set to define a specific clearing delay in days.
This means that the NGV payment clearing will be delayed by the amount of days specified. This flow shows a successful NGV payment including
a clearing delay.
Austrian Flow: NGV Purchase fallback with Non-NGV card
The following flow describes an NGV payment with NGVMode "AllowedWithFallback" which
results in a fallback to a standard purchase due to the fact that the card used is not capable of NGV payments.
The NGVUsedFlag is used to determine if the NGV payment was performed as such or if a fallback
was used. In this case the NGVUsedFlag value is set to "false" which indicates that the requested
NGV payment was not successful and the fallback to a standard purchase has been done.
Austrian Flow: NGV Purchase mandatory with error
The following flow describes a mandatory NGV purchase transaction which could not be performed by the terminal.
As the used NGVMode is "Mandatory" but the card used is not capable of NGV payments, the
transaction results in an error which means a resultCode != '0' and an error payload as transaction response.
Logging
LogLevel
By default the TIM API has a Logger that defines how much logging is generated inside the TIM API. To this Logger different handlers can be added, e.g. ConsoleHandler for logging into the debug console or FileHandler to log into a file. By default a FileHandler is added to the TIM API logger.
The following logging levels are valid:
- off
- severe
- warning
- info
- fine
- finest
The logging level can be adjusted programatically as follows after a terminal object has been created:
Swift Specifics
Swift Architecture Striping
For Swift, the TIM API is delivered as a "Universal Framework". This means that the framework is build for multiple architectures, for the physical iPhone (ARM) and for the iOS simulator (x86) for development purposes.
To be able to upload your application to the Apple AppStore you must stripe the unused architecture from the framework as Apple does not allow "Universal Frameworks" to be part of an App in the AppStore. This can be done by adding a "Run Script" step to your build steps. Put is after your step to embed frameworks, set it to use "/bin/sh" and enter the following script:
APP_PATH="${TARGET_BUILD_DIR}/${WRAPPER_NAME}"

# This script loops through all the frameworks that you have embedded
# in the application and removes all unused architectures.
# This procedure is required to be able to upload your application to the AppStore, that
# uses the TIM API.
find "$APP_PATH" -name '*.framework' -type d | while read -r FRAMEWORK
do
    FRAMEWORK_EXECUTABLE_NAME=$(defaults read "$FRAMEWORK/Info.plist" CFBundleExecutable)
    FRAMEWORK_EXECUTABLE_PATH="$FRAMEWORK/$FRAMEWORK_EXECUTABLE_NAME"
    echo "Executable is $FRAMEWORK_EXECUTABLE_PATH"

    EXTRACTED_ARCHS=()

    for ARCH in $ARCHS
    do
        echo "Extracting $ARCH from $FRAMEWORK_EXECUTABLE_NAME"
        lipo -extract "$ARCH" "$FRAMEWORK_EXECUTABLE_PATH" -o "$FRAMEWORK_EXECUTABLE_PATH-$ARCH"
        EXTRACTED_ARCHS+=("$FRAMEWORK_EXECUTABLE_PATH-$ARCH")
    done

    echo "Merging extracted architectures: ${ARCHS}"
    lipo -o "$FRAMEWORK_EXECUTABLE_PATH-merged" -create "${EXTRACTED_ARCHS[@]}"
    rm "${EXTRACTED_ARCHS[@]}"

    echo "Replacing original executable with thinned version"
    rm "$FRAMEWORK_EXECUTABLE_PATH"
    mv "$FRAMEWORK_EXECUTABLE_PATH-merged" "$FRAMEWORK_EXECUTABLE_PATH"

done
The script will look through your built applications "Frameworks" folder and make sure only the architectures you’re building for are present in each Framework.