Introduction
The TIM API is the standard application interface for ECR integration using SIX Payment Services terminals.
TIM API provides a comprehensive feature set to support the requirements of several different markets. This guideline is intended to be used by ECR integrators that need to implement the TIM API functionality in their products.
The following document contains an overview structure, description of the TIM API modes synchronous/asynchronous and describes the corresponding functions, notifiers and data elements that can be used with the TIM API. Furthermore implementation examples are provided. Nevertheless always the corresponding description of a function or data element is authoritative, not the examples.
For further information about the architecture of the TIM API can be found in [B1], this document is meant to cover only implementation purposes.
Setup Configuration
The configuration of the Terminal can be done in two ways:
- In a configuration file “TimApi.cfg”.
- Using / configuring the
TerminalSettingswithin the application.
Once a
Terminal-instance has been created with a
TerminalSettings-instance, the settings can not be changed anymore.
Changes to the
TerminalSettings-instance will be ignored.
The network and guides configuration as well as the configuration file are explained in the following
chapters.
For further information refer to
TerminalSettings.
Network Configuration
The TIM API module can communicate with the Terminal over different communication channels. The default communication is over TCP/IP connection.
For TCP/IP connection there are two possible ways to connect to the terminal:
-
Broadcast-Mode:
- Terminal ID (TID) is known.
- The TIM API starts broadcasting on the default interface and connects to the connection information sent by the matching terminal.
-
Direct Connect:
- IP address of the terminal is known.
- Connection is established directly via IP.
Guides Configuration
There are various
Guides
covering different use case scenarios. The guide retail is the basic guide and is activated as
default. With
setGuides
the guides can be configured. Important: the configuration needs to include all desired guides
(including
the retail guide).
Code-example for creating a terminal including settings with activated guides retail and hospitality:
// Create settings with Terminal-ID of terminal to connect to
com.six.TerminalSettings settings = new com.six.TerminalSettings();
settings.setTerminalId("12345678");

// add wanted guides (with bitwise or)
settings.setGuides(EnumSet.of(Guides.RETAIL, Guides.HOSPITALITY));

// Create terminal
com.six.Terminal terminal = new com.six.Terminal(settings);

//...

// Disconnect from terminal and clean up properly
terminal.dispose();
Configuration File
With the use of the configuration file “TimApi.cfg”
TerminalSettings
can be set from outside of the application. If the user wishes to use multiple instances of the
Terminal
class it can be configured using ini-sections in the config file which are separated with a user
defined
DeviceId. The same DeviceId has to be used in the constructor of the TerminalSettings class if
the specified
configuration is wished to use. If no DeviceId is specified the global ini-section is used.
The precedence of the configuration is as follows:
- TimApi.cfg will be read first by creating a
TerminalSettingsobject - The config previously read from the TimApi.cfg file can be overwritten by hand using setter
methods from
the
TerminalSettingsclass.
Table with Configuration File Parameters:
| Parameter | Description |
|---|---|
| LogDir | Directory where log files are generated |
| LogLevel | Logging level, defines how much information will be logged. For detailed values see Logging / LogLevel |
| TerminalId | Terminal ID to be broadcasted in case of ConnectionMode Broadcast |
| ConnectionMode | Connection mode used between ECR and EFT. For more information see
ConnectionMode
|
| ConnectionIPString | IP address of the EFT terminal in case of ConnectionMode OnFixIP and Websockets. |
| ConnectionIPPort | Listening Port of the EFT terminal in case of ConnectionMode OnFixIP and Websockets. |
| SerialPort | Serial port to be used for serial connection in case of ConnectionMode Serial. |
| SerialBaudrate | Baudrate used in case of ConnectionMode Serial. |
| ProtocolType | Protocol type. For detailed values see
ProtocolType.
|
| FetchBrands | Automatically retrieves application information during logging in. Default is on (value “On” or “Off”) |
| AutoCommit | After executing the Transaction- function the API commits the transaction automatically. Default is on (value “On” or “Off”) |
| RequestRepetition | Defines how many times a Commit or Rollback request is sent repeatedly, if the original request has been lost. (Default = 0, means disabled = no repetition) |
| EnableKeepAlive | Defines if KeepAlive functionality shall be enabled or not. Default is on (value “On” or “Off”). |
| SecuredConnection | Defines if the TCP/IP or Websocket connection shall be secured using TLS. Default is off (value “On” or “Off”). |
Example “TimApi.cfg”: This example describes the TimApi.cfg file with a global ini-section and two different ini-sections for specific DeviceIds:
[global]
ProtocolType = SIXml
TerminalId = 21001234
LogDir = var/log

[MyDeviceId]
ProtocolType = SIXml
TerminalId = 12345678
LogDir = var/otherLog

[MySecondDeviceId]
ProtocolType = SIXml
TerminalId = 87654321
LogDir = var/yetAnotherLog
ConnectionMode = OnFixIp
ConnectionIPString = 192.168.1.13
RequestRepetition = 2

[MyThirdDeviceId]
ProtocolType = SIXml
TerminalId = 18000001
LogDir = var/yetAnotherLog
ConnectionMode = Serial
SerialPort = COM1
SerialBaudrate = 115200

[MyFourthDeviceId]
ProtocolType = SIXml
TerminalId = 18000004
LogDir = var/yetAnotherLog
ConnectionMode = Websockets
ConnectionIPString = 192.168.1.13
ConnectionIPPort = 80
SecuredConnection = On
Operation Overview
Follow these basic steps for using the TIM API:
- Create
TerminalSettingsand initialize connection parameters (see Setup Configuration) - Create
Terminalinstance using the createdTerminalSettings - Set some properties if needed:
- set
PosId -
create mandatory
list of
EcrInfoand add withaddEcrData - create list of
PrintOptionsand set withsetPrintOptions - add listeners (
addListeners)
- set
-
ConnectandLogin. This can be done automatically, when the first terminal operation is called or manually using the login method. - Use terminal operation functions.
A basic flow to perform a transaction is:
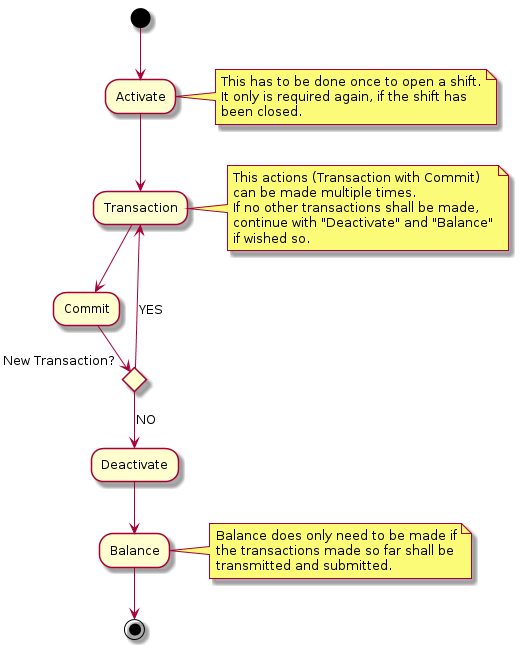
Automatisms
The TIM API uses two different types of automatisms:
-
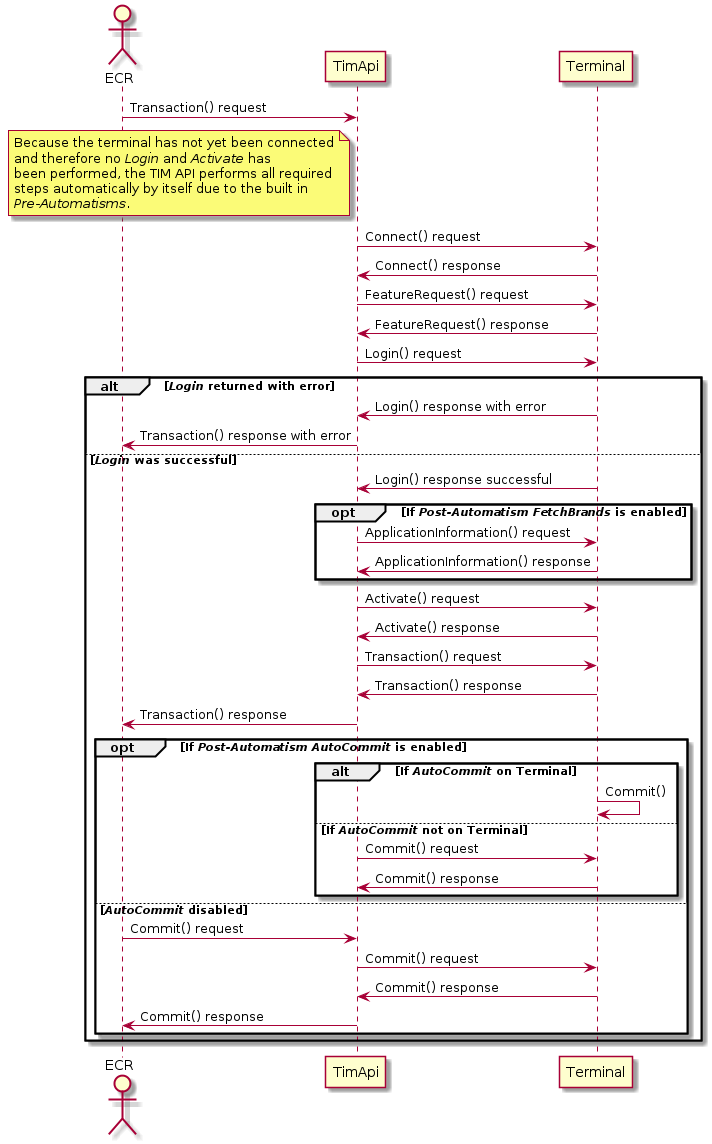
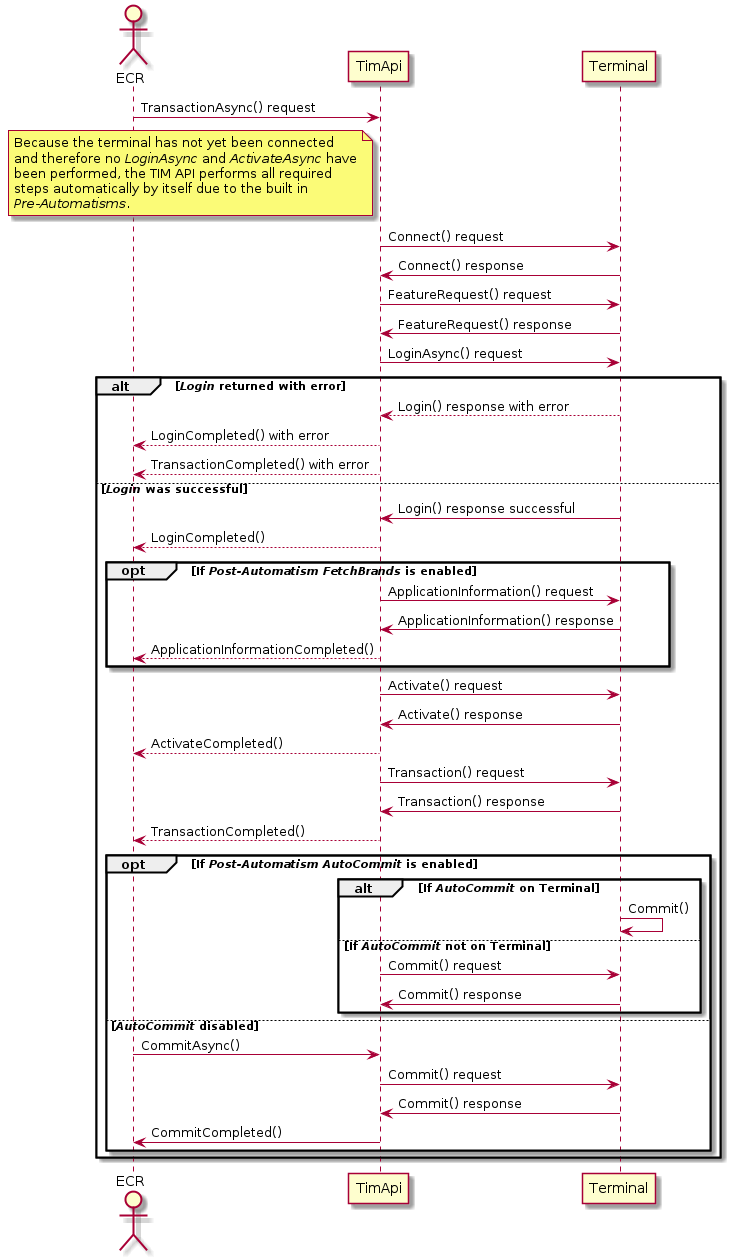
Pre-Automatisms: This means that all actions that need to be done before a function can be called. E.g. a transaction can be called in disconnected state without having called connect, login and activate in advance. These are called automatically by the TIM API before the transaction is performed. The Pre-Automatisms are enabled by default.
-
Post-Automatisms: These automatisms can be enabled or disabled using the members
autoCommitandfetchBrands. A Post-Automatism is triggered after an action has been performed. E.g. if a connect has been called andfetchBrandsis activated, anapplicationInformationrequest is called automatically after the connect. Or ifautoCommitis activated acommitis performed automatically after a transaction has been made.autoCommitandfetchBrandsare enabled by default.
The following diagrams show the principle of the Pre-Automatisms and Post-Automatisms. Pre-Automatisms are enabled by default and cannot be disabled. If an error occurs the started request from the ECR is returned with an error.
Synchronous flow
Asynchronous flow
Terminal methods overview
The basic operation modes of terminal method calls are:
-
Synchronous
Method calls are blocking and return after operation is finished successfully or throw a TimException otherwise. -
Asynchronous
Method returns immediately after the operation has started or throws aTimExceptionotherwise. A listener-event-method will be called after operation is finished successfully. All listener-event-methods contain aTimEvent. In case of failure aTimExceptionis included. User-implemented listener-handlers can be added to theTerminal-instance withaddListener.
Functions called on terminal perform synchronous by default. The asynchronous method has the same name with Async appended to its name.
Code example for adding a terminal listener:
/** Asynchronous listener handling terminal events. */
class TerminalHandler extends com.six.DefaultTerminalListener {

    /** Terminal status change which can be the display content or an operational state. */
    @Override
    public void terminalStatusChanged(final Terminal terminal) {
        // Events usually originate from a different thread than the main thread.
        // Always use SwingUtilities.invokeLater to be safe
        SwingUtilities.invokeLater(new Runnable() {
            @Override
            public void run() {
                logger.info("Terminal status changed");
            }
        });
    }

    /** Transaction request completed either successfully or with a failure. */
    @Override
    public void transactionCompleted(com.six.TimEvent event, final com.six.TransactionResponse data) {
        // Always super-call transactionCompleted(). This ensures requestCompleted() and
        // printReceipts() are properly called. You can do you own processing before or
        // after the super-call depending on your needs.
        super.transactionCompleted(event, data);
        // Events usually originate from a different thread than the main thread.
        // Always use SwingUtilities.invokeLater to be safe
        SwingUtilities.invokeLater(new Runnable() {
            @Override
            public void run() {
                // handle transaction finished using data
            }
        });
    }
}

// Create settings with Terminal-ID of terminal to connect to
com.six.TerminalSettings settings = new com.six.TerminalSettings();
settings.setTerminalId("12345678");

// Create terminal
com.six.Terminal terminal = new com.six.Terminal(settings);

// Add listener to handle events
terminal.addListener(new TerminalHandler());

// Run transaction
terminal.transactionAsync(com.six.constants.TransactionType.PURCHASE,
    new com.six.Amount(8.5, com.six.constants.Currency.CHF));

// Once the transaction completes TerminalHandler.transactionCompleted will be called
// TerminalHandler.terminalStatusChanged will be called after every status change
Main / guide retail terminal functions
|
Sync method
Async method Completed event |
Description |
|---|---|
activate
activateAsync
activateCompleted
|
Open a user shift. |
applicationInformation
applicationInformationAsync
applicationInformationCompleted
|
Request the list of brands available on the terminal. |
balance
balanceAsync
balanceCompleted
|
Force the EFT Terminal to transmit all transactions to the
host system as well to do the daily closing. |
changeSettings
changeSettingsAsync
changeSettingsCompleted
|
Change configuration parameters of the EFT Terminal. |
commit
commitAsync
commitCompleted
|
Perform Commit-operation after a successful Transaction call. |
connect
connectAsync
connectCompleted
|
Initiates a connection to the EFT Terminal. |
counterRequest
counterRequestAsync
counterRequestCompleted
|
Get counter information`s from the EFT Terminal. |
dccRates
dccRatesAsync
dccRatesCompleted
|
Request DCC rates from the EFT Terminal. |
deactivate
deactivateAsync
deactivateCompleted
|
Close a user shift. |
disconnect
disconnectAsync
disconnected
|
Interrupts the connection to the EFT Terminal. |
hardwareInformation
hardwareInformationAsync
hardwareInformationCompleted
|
Get hardware information from the EFT Terminal. |
login
loginAsync
loginCompleted
|
Activate a communication session between the ECR and
the terminal. |
logout
logoutAsync
logoutCompleted
|
Terminate an active communication session between the ECR and the terminal. |
reboot
rebootAsync
rebootCompleted
|
Force the EFT Terminal to reboot. |
receiptRequest
receiptRequestAsync
receiptRequestCompleted
|
Receive the latest receipt or a list of silent receipts. |
reconciliation
reconciliationAsync
reconciliationCompleted
|
Force the EFT Terminal to transmit all financial transactions
to the host system. |
reconfig
reconfigAsync
reconfigCompleted
|
Force the EFT Terminal to get the configuration from the service center. |
rollback
rollbackAsync
rollbackCompleted
|
Prevent a transaction from being committed to the transaction
log and generates a technical reversal of the authorization. |
softwareUpdate
softwareUpdateAsync
softwareUpdateCompleted
|
Force the EFT Terminal to start a Software Update. |
systemInformation
systemInformationAsync
systemInformationCompleted
|
Request system information from the EFT Terminal. |
transaction
transactionAsync
transactionCompleted
|
Starts an EFT Terminal Transaction. |
Guide dialog terminal functions
|
Sync method
Async method Completed event |
Description |
|---|---|
openDialogMode
openDialogModeAsync
openDialogModeCompleted
|
Open dialog mode on the terminal. |
closeDialogMode
closeDialogModeAsync
closeDialogModeCompleted
|
Close dialog mode on the terminal. |
showDialog
showDialogAsync
showDialogCompleted
|
Show dialog on the terminal. |
showSignatureCapture
showSignatureCaptureAsync
showSignatureCaptureCompleted
|
Show signature capture on the terminal. |
Additional terminal listener-events
| Listener-event | Description |
|---|---|
requestCompleted
|
Operation started by an asynchronous function has finished.
Applications can use both operation specific completion callback in combination with this generic completion callback. |
terminalStatusChanged
|
The terminal status has changed. The new status can be
retrieved from the TerminalStatus property. |
Logging
By default the TIM API has a Logger that defines how much logging is generated inside the TIM API. To this Logger different handlers can be added, e.g. ConsoleHandler for logging into the debug console or FileHandler to log into a file. By default a FileHandler is added to the TIM API logger.
The standard Java LogLevels are valid:
- ALL
- FINEST
- FINER
- FINE
- CONFIG
- INFO
- WARNING
- SEVERE
- OFF
The logging level in Java can be adjusted programatically as follows after a terminal object has been created:
// Set the TIM API internal logging level
Logger.getLogger(terminal.getLoggerName()).setLevel(Level.ALL);

// Set the logging level of the different handlers that have been added to the logger
Handler[] handlers = Logger.getLogger(terminal.getLoggerName()).getHandlers();

for (Handler handler : handlers){
    handler.setLevel(Level.FINEST);
}

// To add a special handler to the TIM API logger
Logger.getLogger(terminal.getLoggerName()).addHandler(myHandler);
Code Examples
This chapter contains example implementations for TIM API.
A simple implementation using synchronous calls looks like this:
package simpletransaction;

import com.six.timapi.Terminal;
import com.six.timapi.TerminalSettings;
import com.six.timapi.TimException;
import com.six.timapi.constants.TransactionType;
import com.six.timapi.Amount;
import com.six.timapi.Receipt;
import com.six.timapi.constants.Currency;
import com.six.timapi.TransactionResponse;

import java.util.logging.Handler;
import java.util.logging.Level;
import java.util.logging.Logger;

public class SimpleTransaction {

    public static void main(String[] args) {

        // Create initial terminal settings
        TerminalSettings settings = new TerminalSettings();

        // Define terminal ID for default connection mode BROADCAST
        settings.setTerminalId("12345678");

        // Define log directory
        settings.setLogDir("C:\\Temp");

        // Create new terminal
        Terminal terminal = new Terminal(settings);

        // The logging level can be adjusted as follows, after the terminal object has been created.
        // The standard Java logging levels are valid
        Logger.getLogger(terminal.getLoggerName()).setLevel(Level.ALL);

        // By default, the logger has a FileHandler for logging into a file. The logging level that shall be
        // used for the file logging can be adjusted as follows.
        for (Handler handler : Logger.getLogger(terminal.getLoggerName()).getHandlers())
        {
            handler.setLevel(Level.FINEST);
        }

        try{
            // Start transaction. Automatically connects to and activates the terminal
            TransactionResponse trxResponse = terminal.transaction(TransactionType.PURCHASE, new Amount( 14.00,
            Currency.CHF));

            // If successful
            System.out.println("Transaction successful");

            // Both cardholder and merchant receipt are returned
            for(Receipt receipt : trxResponse.getPrintData().getReceipts()) {
                System.out.println(receipt.getRecipient() + receipt.getValue());
            }
        }

        catch (TimException te) {
            System.out.println("Transaction failed, exception: " + te.toString() );
        }

        catch (Exception se) {
            System.out.println("Systemexception: " + se.getMessage());
        }
    }
}
The same example as above but using asynchonous calls can look as follows:
import com.six.timapi.Terminal;
import com.six.timapi.TerminalSettings;
import com.six.timapi.Amount;
import com.six.timapi.constants.TransactionType;
import com.six.timapi.constants.Currency;

import javax.swing.*;

class ECRSample {
    public static void main(String [] args) {
        // Create terminal settings as described in the example above!
        TerminalSettings trmSettings = new TerminalSettings();

        // Create terminal instance using the communication settings. These settings can
        // not be changed anymore at a later time.
        Terminal terminal = new Terminal(trmSettings);

        // Set properties affecting the next login and transaction process. Changing POS-ID
        // has no effect until the next logout-login. Changing User-ID affects the next
        // transaction initiated
        terminal.setPosId("POS1234");
        terminal.setUserId(12345678);

        // Add the notifiers you wish to handle.
        // It can be done by adding a subclass of six.timap.TerminalNotifier as follows:

        // Add activateCompleted, transactionCompleted, commitCompleted, deactivateCompleted
        // and balanceCompleted notifier if required.
        terminal.addListener(new TerminalListener() {
            @Override
            public void activateCompleted(TimEvent e, ActivateResponse data) {
                // my code to be called if a activate request completed.
            }

            @Override
            public void transactionCompleted(TimEvent e, TransactionResponse data) {
                // my code to be called if a transaction request completed.

                // After the transaction request is completed correctly, a commit can be performed.
                // Only required if AutoCommit is not enabled.
                SwingUtilities.invokeLater(new Runnable() {
                    public void run() {
                        terminal.commitAsync();
                    }
                });
            }

            @Override
            public void commitCompleted(TimEvent e) {
                // my code to be called if a commit request completed.

                // A deactivateAsync() can be called here. This is not required if the option
                // AutoDeactivate is enabled, it will then be performed automatically.
                SwingUtilities.invokeLater(new Runnable() {
                    public void run() {
                        terminal.deactivateAsync()
                    }
                });

                // If AutoDeactivate is enabled, a balanceAsync() can be called directly and a
                // deactivation will be performed automatically.
                SwingUtilities.invokeLater(new Runnable() {
                    public void run() {
                        terminal.balanceAsync()
                    }
                });
            }

            @Override
            public void deactivateCompleted(TimEvent e, DeactivateResponse data) {
                // my code to be called if a deactivate request completed.
            }

            @Override
            public void balanceCompleted(TimEvent e, BalanceResponse data) {
                // my code to be called if a balance request completed.
            }
        });


        // Start a transaction process
        // If the terminal is not yet logged in or activated this two actions are performed
        // automatically before performing the transaction.
        terminal.transactionAsync(TransactionType.PURCHASE, new Amount(12.50, Currency.CHF));

        // If the option AutoCommit is enabled the commitAsync() method is called automatically
        // after the transaction has finished.
        // If not enabled, the commitAsync() method shall be called after receiving the
        // transactionCompleted event.

        // If the commit request is completed correctly the deactivate can be started
        // (see commitCompleted method). If the AutoDeactivate option is enabled a deactivateAsync()
        // is not required to be called. Another request that need a Deactivated state will then
        // perform a deactivateAsync() automatically. Otherwise the deactivateAsync() method can
        // be called after a successful commitCompleted event.

        // So if AutoDeactivate is enabled, a balanceAsync() can be called directly.
        // This can be done e.g. in the commitCompleted event (see commitCompleted event).
    }
}
Attention: Events are send from inside a thread different than the main thread. If you need to access code in the event handling thread use something like java.awt.EventQueue.invokeLater or javax.swing.SwingUtilities.invokeLater
Reference
| Ref. | Document | Version |
|---|---|---|
| [B1] | TIM & SIXml Architecture: The SIX ECR Integration System | 0.10 |